This is actually a mock cream cheese, and it's made the same way as homemade yogurt. In taste tests my mother-in-law and I have had, it tastes almost the same as regular cream cheese, and you can use it in all the same recipes--cheese cake, cheese balls, key lime pie, and all the rest. The best part is, it's fat free. To incubate, you can use either a cooler with warm water or a yogurt maker.
Homemade Cream Cheese
Combine:
1-1/2 c. warm water
2 1/2 c. non-instant dry milk powder (5 cups instant)
1/4-1/2 c. plain yogurt with active culture
Add:
2 c. warm water
Pour into containers and cover with lids (use a yogurt maker or canning jars with lids).
If you're using a yogurt maker, set the timer for 12 hours and rotate the jars after 6 hours.
If you're using a cooler, surround jars with warm water, and cover. Replace the water every 2 hours or so to maintain a temperature range between 100 and 120 degrees F.
Makes approximately 6 cups of cream cheese.
Note:
If your cream cheese is too runny, you can drain it by placing the cheese in a strainer lined with cheese cloth or a towel. Just let it sit for as long as it takes to reach your desired consistency.
Showing posts with label food storage. Show all posts
Showing posts with label food storage. Show all posts
Tuesday, December 20

Holiday Party Food: Cheese Balls
Hello out there!
Christmas Eve parties are just a few days away, and New Year's Eve parties aren't that far away either. Have you started planning your menus? Cheese balls make great appetizers--they're fast and easy to make, and they look and taste impressive. You can make the cheese balls in the recipes below with either store-bought cream cheese or homemade cream cheese (for a recipe for homemade cream cheese, check my next post here). Cheese balls made with homemade cream cheese may not be as firm, but they will still set up and hold their shape, and they taste every bit as good.
Cheddar Cheese Ball
1 c. finely shredded cheddar cheese
1 3 oz. pkg. cream cheese, or 1/2 cup homemade cream cheese
2 T butter
1 T milk
1 T finely chopped green onion
1 T diced pimiento (opt.)
1 tsp. worcestershire sauce
1/2-1/3 c. chopped walnuts or slivered almonds
Bring cheeses and butter to room temperature. Combine in med. sized mixing bowl with milk, onion, pimiento, and worcestershire sauce. Cover and chill for 4-24 hours. Shape mixture into a ball; roll in nuts. Let stand 15 minutes. Serve with crackers or vegetables.
Basic Cheese Ball
1 c. cream cheese
2 tbsp. butter
1 tsp. worcestershire sauce
3/4 tsp. garlic powder
1 tsp. dried minced onion
1/2-1/3 c. chopped walnuts or slivered almonds
Bring cheese and butter to room temperature; combine all ingredients except nuts. Refrigerate 4-24 hours; shape into ball and roll in nuts. Serve with crackers or vegetables.
With this recipe, you're a little more free to experiment. Try adding bacon bits, sun-dried tomatoes, dried garden vegetables, or whatever flavor you want.
Bon Appetit!
Christmas Eve parties are just a few days away, and New Year's Eve parties aren't that far away either. Have you started planning your menus? Cheese balls make great appetizers--they're fast and easy to make, and they look and taste impressive. You can make the cheese balls in the recipes below with either store-bought cream cheese or homemade cream cheese (for a recipe for homemade cream cheese, check my next post here). Cheese balls made with homemade cream cheese may not be as firm, but they will still set up and hold their shape, and they taste every bit as good.
Cheddar Cheese Ball
1 c. finely shredded cheddar cheese
1 3 oz. pkg. cream cheese, or 1/2 cup homemade cream cheese
2 T butter
1 T milk
1 T finely chopped green onion
1 T diced pimiento (opt.)
1 tsp. worcestershire sauce
1/2-1/3 c. chopped walnuts or slivered almonds
Bring cheeses and butter to room temperature. Combine in med. sized mixing bowl with milk, onion, pimiento, and worcestershire sauce. Cover and chill for 4-24 hours. Shape mixture into a ball; roll in nuts. Let stand 15 minutes. Serve with crackers or vegetables.
Basic Cheese Ball
1 c. cream cheese
2 tbsp. butter
1 tsp. worcestershire sauce
3/4 tsp. garlic powder
1 tsp. dried minced onion
1/2-1/3 c. chopped walnuts or slivered almonds
Bring cheese and butter to room temperature; combine all ingredients except nuts. Refrigerate 4-24 hours; shape into ball and roll in nuts. Serve with crackers or vegetables.
With this recipe, you're a little more free to experiment. Try adding bacon bits, sun-dried tomatoes, dried garden vegetables, or whatever flavor you want.
Bon Appetit!
Saturday, December 10
Wheat Bread to Warm Your Kitchen and Your Heart
Home-baked bread is another one of those "soul foods" for me. The smell and the taste just make my family and me feel safe, warm, and loved. Lately my husband and I have been on a whole foods kick--trying to cut down on artificial fillers and processed "fake-foods." One of the things I've started to do is make our own bread, and it's been wonderful. I was apprehensive at first; partly because I thought bread took a long time to make, and partly because whenever I'd made wheat bread in the past, it had always turned out dry and crusty. As I was looking through a textbook for my old foods class at BYU, I found a recipe for "Foolproof Wheat Bread" and decided to try it. It was wonderful! It uses vital wheat gluten to make the bread lighter, so it's not so dense and dry. Also, it doesn't need much attention and goes really fast. If you don't have wheat gluten and don't wish to buy any, you can substitute white flour for half of the wheat flour.
Foolproof Wheat Bread
Makes 2 loaves
1 T yeast dissolved in
1/4 c. warm water
2-1/2 c. hottest tap water
2 c. whole wheat flour (we like the taste of red wheat best)
2 T vital wheat gluten
3 T vegetable oil
3 T honey
3 T molasses
1 T salt
2-4 c. additional wheat flour
Optional: cinnamon sugar, raisins, dried apples, nuts, etc.
Dissolve yeast in 1/4 c. warm water. In a large bowl, combine 2-1/2 c. hot tap water, 2 c. wheat flour, and gluten. Add oil, honey, molasses, and salt; beat well. Next, stir in dissolved yeast and enough of the flour to make a soft dough that pulls away from the bowl. Turn on to a floured counter top and knead well for 8-10 minutes, adding flour as necessary. Divide dough into two portions and roll or press into long rectangles. If desired, rub cinnamon sugar onto surface of dough, and sprinkle on raisins, nuts, or dried fruit. (If you don't want to add anything, you can just shape your dough balls into loaves.) Roll dough and pinch the edges closed.
Place dough in greased bread pan, seam side down. Lightly grease top of each loaf, cover loosely with a towel, and let rise in a warm place until not quite double. Bake at 350 for 30-40 minutes, until golden brown. Remove bread from pans immediately; brush tops with butter. Let cool completely before storing in plastic.
Foolproof Wheat Bread
Makes 2 loaves
1 T yeast dissolved in
1/4 c. warm water
2-1/2 c. hottest tap water
2 c. whole wheat flour (we like the taste of red wheat best)
2 T vital wheat gluten
3 T vegetable oil
3 T honey
3 T molasses
1 T salt
2-4 c. additional wheat flour
Optional: cinnamon sugar, raisins, dried apples, nuts, etc.
Dissolve yeast in 1/4 c. warm water. In a large bowl, combine 2-1/2 c. hot tap water, 2 c. wheat flour, and gluten. Add oil, honey, molasses, and salt; beat well. Next, stir in dissolved yeast and enough of the flour to make a soft dough that pulls away from the bowl.
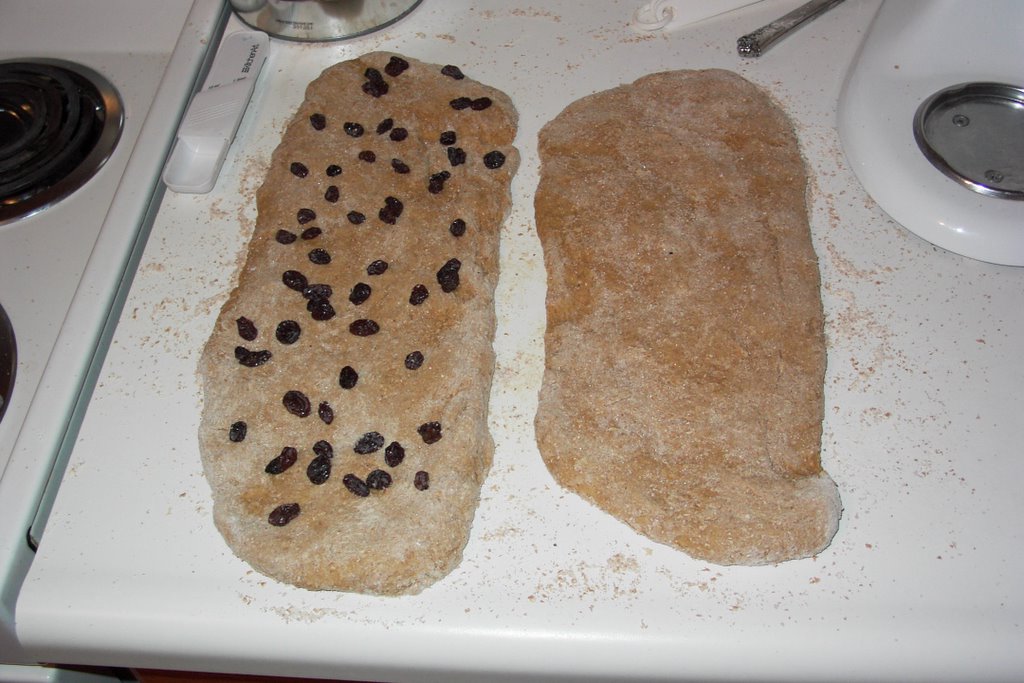 Turn on to a floured counter top and knead well for 8-10 minutes, adding flour as necessary. Divide dough into two portions and roll or press into long rectangles. If desired, rub cinnamon sugar onto surface of dough, and sprinkle on raisins, nuts, or dried fruit. (If you don't want to add anything, you can just shape your dough balls into loaves.) Roll dough and pinch the edges closed.
Place dough in greased bread pan, seam side down. Lightly grease top of each loaf, cover loosely with a towel, and let rise in a warm place until not quite double. Bake at 350 for 30-40 minutes, until golden brown. Remove bread from pans immediately; brush tops with butter. Let cool completely before storing in plastic.
Monday, November 14
Hot Cereal for Cold Mornings
All of a sudden it's winter! Utah's a funny place. One day it's 65 degrees and you're outside in your shorts, and the next it's 38 and you're freezing your bum off. I really love the different seasons though. It's nice to have some variety.
One thing I love about winter mornings is a hot breakfast. But if you're like my husband, who is defintely not a morning person, you usally don't have much time for one. The recipe I'm going to share today is a mix for a wholesome hot cereal that doesn't take much time to prepare, and is really good for you. It's made using equal parts cracked wheat, rice, and beans, so it's got plenty of carbohydrates, dietary fiber, and protein. The recipe here makes 6 cups (about 24 servings), but since it uses equal parts, it's easy to adjust to as much as you want. This cereal tastes a lot like cream of wheat.
Cream of Beans Cooked Cereal:
Using a grinder, crack (coarsly grind) 2 cups each of wheat, brown rice, and white beans.
To prepare cereal:
1. Heat 2 c. milk or water (don't overheat the milk--it'll boil over!)
2. Add 1/2 c. cereal mix and 1/4 tsp. vanilla; whisk well.
3. Simmer until thick, stirring frequently.
4. Serve with honey, brown sugar, raisins, cinnamon, etc.
Bean flour, if you grind it fine, can also be used as a substitute for up to 25% of the white flour in most baking or sauce recipes. This adds a lot of nutritional value without changing the flavor or texture. Beans are a great addition to food storage because they are high in protein, fiber, and lots of other nutrients, and can be prepared so many different ways and adapt to so many different flavors. They make a great substitute for meat, and can be used in all sorts of recipes.
One thing I love about winter mornings is a hot breakfast. But if you're like my husband, who is defintely not a morning person, you usally don't have much time for one. The recipe I'm going to share today is a mix for a wholesome hot cereal that doesn't take much time to prepare, and is really good for you. It's made using equal parts cracked wheat, rice, and beans, so it's got plenty of carbohydrates, dietary fiber, and protein. The recipe here makes 6 cups (about 24 servings), but since it uses equal parts, it's easy to adjust to as much as you want. This cereal tastes a lot like cream of wheat.
Cream of Beans Cooked Cereal:
Using a grinder, crack (coarsly grind) 2 cups each of wheat, brown rice, and white beans.
To prepare cereal:
1. Heat 2 c. milk or water (don't overheat the milk--it'll boil over!)
2. Add 1/2 c. cereal mix and 1/4 tsp. vanilla; whisk well.
3. Simmer until thick, stirring frequently.
4. Serve with honey, brown sugar, raisins, cinnamon, etc.
Bean flour, if you grind it fine, can also be used as a substitute for up to 25% of the white flour in most baking or sauce recipes. This adds a lot of nutritional value without changing the flavor or texture. Beans are a great addition to food storage because they are high in protein, fiber, and lots of other nutrients, and can be prepared so many different ways and adapt to so many different flavors. They make a great substitute for meat, and can be used in all sorts of recipes.
Friday, October 21
Homemade Mozzarella Cheese!
This is it! The big one! The one you've all been waiting for. In today's blog, I'm going to teach you how to make mozzarella cheese at home--from your food storage! The recipe calls for 2 c. half and half, but if you're making it from food storage, use boxed whole milk. It's in the juice aisle, and the box it comes in looks like a juice box. Use two juice boxes per recipe of cheese. You can also use 1-1/2 c. olive oil, but your cheese won't be white. It'll be kind of an off-white. It'll still taste good though. The recipe sounds intimidating, but it only takes a little over half an hour, and it really is quite simple. This recipe makes approximately 3/4 a pound of cheese.
Tools:
Large stainless steel stock pot
Meat or dairy thermometer (one that goes down to at least 70 degrees F)
CALIBRATE YOUR THERMOMETER FIRST!
Slotted spoon
Rubber gloves (like the kind you use for cleaning, only make sure they're only used for food)
Microwave
Ingredients:
1/2 Rennet Tablet (near the Jell-O and Custard; the brand is Junket)
1/4 c. bottled water (non-chlorinated
1 gallon reconstituted dry milk, minus 2 cups (after you mix the milk, let it sit out for a few hours so the flavor can blend)
2 c. half-and-half (not fat free!)
2 tsp. citric acid (you can find this at a health-food store or a pharmacy)
1-2 tsp. non-iodized salt (also called cheese salt or canning salt)
Steps:
1. Crush 1/2 rennet tablet in 1/4 c. cool, non-chlorinated water.
2. In a large stainless steel pot, combine the milk (minus the two cups!) and the half and half. Turn heat to medium.
3. Sprinkle 2 level tsp. citric acid into the milk and stir gently using the slotted spoon. Slowly heat milk to 88 degrees F. You will start to see your milk curdle.
4. Once your milk has reached 88 degrees F, add the dissolved rennet. Continue stirring slowly every few minutes until the milk reaches 105 degrees F. Remove from heat. At this point, you should have some chunky or stringy curds. If your curds aren't huge, let them sit for a while, and they'll get bigger.
5. The milk will separate into white curds and yellowish-green whey. Once it does this, you can scoop the curds out into a microwave-safe bowl or pour into a strainer lined with cheese cloth. Pour off as much of the whey as you can.
6. Microwave the curds on high for 1 minute, drain off excess whey. Knead cheese with your hands--make sure to use your gloves--until cool. While you're kneading, you can add your 1-2 tsp. salt.
7. Put cheese back in the microwave, heat on high for 35 seconds, knead, and repeat. Cheese is done when it is shiny and stretches like taffy.
If you're creative and you like string cheese, you can shape it into rods or other shapes and eat it just like string cheese. It's also great on crackers, lasagna, or wherever else you use cheese. It melts just like the stuff you buy from the store. And be sure to tell all your friends you made your own cheese--they'll be amazed!
Tools:
Large stainless steel stock pot
Meat or dairy thermometer (one that goes down to at least 70 degrees F)
CALIBRATE YOUR THERMOMETER FIRST!
Slotted spoon
Rubber gloves (like the kind you use for cleaning, only make sure they're only used for food)
Microwave
Ingredients:
1/2 Rennet Tablet (near the Jell-O and Custard; the brand is Junket)
1/4 c. bottled water (non-chlorinated
1 gallon reconstituted dry milk, minus 2 cups (after you mix the milk, let it sit out for a few hours so the flavor can blend)
2 c. half-and-half (not fat free!)
2 tsp. citric acid (you can find this at a health-food store or a pharmacy)
1-2 tsp. non-iodized salt (also called cheese salt or canning salt)
Steps:
1. Crush 1/2 rennet tablet in 1/4 c. cool, non-chlorinated water.
2. In a large stainless steel pot, combine the milk (minus the two cups!) and the half and half. Turn heat to medium.
3. Sprinkle 2 level tsp. citric acid into the milk and stir gently using the slotted spoon. Slowly heat milk to 88 degrees F. You will start to see your milk curdle.
4. Once your milk has reached 88 degrees F, add the dissolved rennet. Continue stirring slowly every few minutes until the milk reaches 105 degrees F. Remove from heat. At this point, you should have some chunky or stringy curds. If your curds aren't huge, let them sit for a while, and they'll get bigger.
5. The milk will separate into white curds and yellowish-green whey. Once it does this, you can scoop the curds out into a microwave-safe bowl or pour into a strainer lined with cheese cloth. Pour off as much of the whey as you can.
6. Microwave the curds on high for 1 minute, drain off excess whey. Knead cheese with your hands--make sure to use your gloves--until cool. While you're kneading, you can add your 1-2 tsp. salt.
7. Put cheese back in the microwave, heat on high for 35 seconds, knead, and repeat. Cheese is done when it is shiny and stretches like taffy.
If you're creative and you like string cheese, you can shape it into rods or other shapes and eat it just like string cheese. It's also great on crackers, lasagna, or wherever else you use cheese. It melts just like the stuff you buy from the store. And be sure to tell all your friends you made your own cheese--they'll be amazed!
Monday, October 3
Hinckley's Exhortation, and Canning Tomatoes
What an incredible conference that was! My husband and I have made a resolution to step-up our emergency preparedness efforts. We live in a tiny two-bedroom apartment, and there's definitely not enough room for a one-year supply of everything we need, but we're going to do our best. We stocked up on hygiene items (shampoo, soap, conditioner, toilet paper, paper towels, etc.), and we bought vinyl pants and diaper pins in case I have to resort to cloth diapers (heaven forbid!) for our 6-month-old. Mike's parents said they've got enough food stored for us, so if it should come to that, at least we know we could move in with his parents and younger siblings.
In addition to hygiene items, it's a really good idea to stock up on medicines. They're expensive to buy all at once, but think about how many times you or a family member gets sick or hurt over the course of a year. You want to be sure to stock up on vitamins (rotate these as often as you can though--they don't last more than a couple years), pain killers, antibiotics, and any prescriptions you take. My mother-in-law studies herbal remedies, and there are herbs out there that can do incredible things. If anyone's interested on a post about herbal wonders, let me know, and I'll talk to my mother-in-law about good herbs to store and what they're for, and what quantities you'll need.
Enough about that for now. If anyone wants another post on emergency storage, let me know, and I'll do it. Last week I promised I'd post on canning tomatoes, so here goes.
I researched tomato canning on the web last week, and I found so many recipes that I didn't know where to start. I decided though that I just wanted plain old tomatoes, so I packed quartered tomatoes in water and used a steam canner. Here's the procedure I used:
Equipment:
Tomatoes
Lemon juice
Salt
Canning jars--pint or quart (mouth size doesn't matter)
New (cleaned) lids
Band for each jar
Funnel
Ladle
Steam canner
Jar tongs
1. Clean jars in dishwasher; make sure jars are hot, and don't take them out until you're ready to pack them.
2. Boil two pots of water: one for blanching, one for hot water pack.
3. Clean tomatoes. Place in large bowl.
4. Pour boiling water over tomatoes. Let the tomatoes sit in the hot water until their skins split.
5. Pour out the hot water and remove the skins from the tomatoes.
6. Remove the stem core. At this point, you can either leave the tomatoes whole or cut them into quarters or halves.
7. Pack tomatoes in jars.
8. Add 1/2 tsp. salt (preserves color, adds flavor) and 1 Tbsp. lemon juice for pint jars, 1 tsp. salt and 2 Tbsp. lemon juice for quart jars.
9. Using a ladle and a funnel, pour water into jars, leaving 1/2 inch headspace in pint jars, 1 inch in quart jars.
10. Wipe off necks and rims of jars using a warm wet paper towel.
11. Place lids over each jar, then screw on the bands.
12. Pour hot water in steam canner. Place filled jars on rack of canner.
13. Place the lid over the canner and jars, and turn stove on medium high heat. When the steam escapes in a steady stream, start timing. Tomatoes need to process 40 minutes for pint jars, and about 45 minutes for quart jars.
14. When the tomatoes have processed for the correct amount of time, carefully raise the lid, being sure to open it away from your face so you're not burned by the escaping steam.
15. Using the jar tongs, remove the jars and place them on a towel on your counter top to cool. The lids won't seal correctly until the jars have cooled completely.
It was so exciting for me when I found out that my jars had sealed and the whole thing had worked. I've only ever canned with my mother-in-law, so even though I've done it lots of times, I've never done it by myself. There's a real sense of satisfaction and achievement when you can grow and preserve your own food storage.
In addition to hygiene items, it's a really good idea to stock up on medicines. They're expensive to buy all at once, but think about how many times you or a family member gets sick or hurt over the course of a year. You want to be sure to stock up on vitamins (rotate these as often as you can though--they don't last more than a couple years), pain killers, antibiotics, and any prescriptions you take. My mother-in-law studies herbal remedies, and there are herbs out there that can do incredible things. If anyone's interested on a post about herbal wonders, let me know, and I'll talk to my mother-in-law about good herbs to store and what they're for, and what quantities you'll need.
Enough about that for now. If anyone wants another post on emergency storage, let me know, and I'll do it. Last week I promised I'd post on canning tomatoes, so here goes.
I researched tomato canning on the web last week, and I found so many recipes that I didn't know where to start. I decided though that I just wanted plain old tomatoes, so I packed quartered tomatoes in water and used a steam canner. Here's the procedure I used:
Equipment:
Tomatoes
Lemon juice
Salt
Canning jars--pint or quart (mouth size doesn't matter)
New (cleaned) lids
Band for each jar
Funnel
Ladle
Steam canner
Jar tongs
1. Clean jars in dishwasher; make sure jars are hot, and don't take them out until you're ready to pack them.
2. Boil two pots of water: one for blanching, one for hot water pack.
3. Clean tomatoes. Place in large bowl.
4. Pour boiling water over tomatoes. Let the tomatoes sit in the hot water until their skins split.
5. Pour out the hot water and remove the skins from the tomatoes.
6. Remove the stem core. At this point, you can either leave the tomatoes whole or cut them into quarters or halves.
7. Pack tomatoes in jars.
8. Add 1/2 tsp. salt (preserves color, adds flavor) and 1 Tbsp. lemon juice for pint jars, 1 tsp. salt and 2 Tbsp. lemon juice for quart jars.
9. Using a ladle and a funnel, pour water into jars, leaving 1/2 inch headspace in pint jars, 1 inch in quart jars.
10. Wipe off necks and rims of jars using a warm wet paper towel.
11. Place lids over each jar, then screw on the bands.
12. Pour hot water in steam canner. Place filled jars on rack of canner.
13. Place the lid over the canner and jars, and turn stove on medium high heat. When the steam escapes in a steady stream, start timing. Tomatoes need to process 40 minutes for pint jars, and about 45 minutes for quart jars.
14. When the tomatoes have processed for the correct amount of time, carefully raise the lid, being sure to open it away from your face so you're not burned by the escaping steam.
15. Using the jar tongs, remove the jars and place them on a towel on your counter top to cool. The lids won't seal correctly until the jars have cooled completely.
It was so exciting for me when I found out that my jars had sealed and the whole thing had worked. I've only ever canned with my mother-in-law, so even though I've done it lots of times, I've never done it by myself. There's a real sense of satisfaction and achievement when you can grow and preserve your own food storage.
Friday, September 23
Delicious Cottage Cheese
Hello out there!
Well, I tried out a new recipe yesterday--I made cottage cheese out of my food storage. It was so great!! The recipe I had said it would take 6-12 hours to set up, but mine was set and finished in about 3, so it went way faster than I thought it would. I was really surprised by how easy it was! Later that evening, I took it up to my in-laws house, and the entire batch was gone in minutes. With this recipe, the cheese turns out light and fluffy, with curds as large or small as you want them. It's not at all slimy like the stuff from the grocery store.
Cottage Cheese:
2 c. warm water
1/4 rennet tablet (By Jell-O in the stores--the brand is called Junket. Store extras in the freezer for up to 18 months.)
2 c. warm water
2 2/3 c. instant powdered milk (1 1/2 c. non-instant)
1/4 c. buttermilk
1/2 tsp. salt (optional)
milk/cream (optional)
In a medium-large bowl, dissolve rennet in the 2 c. warm water, and set aside. Combine the remaining water, the powdered milk, and the buttermilk. Add the milk mixture to the rennet and stir well. If you want your cheese to set faster, place the bowl with the mixture inside a larger bowl of warm water; if you don't care, just leave it on a counter in a warm room. The cottage cheese is set when it slides around in the bowl but retains its shape. It should have a touch of whey (yellowish-watery stuff) on the edges. When it's set, cut the curd into 1/2 inch squares and set the bowl into a sink (or a bigger bowl) of hot water. Gently stir the curds, breaking them into your desired size, until they are warmed all the way through and have broken into curds and whey. Pour entire mixture into a strainer lined with cheesecloth. Drain and rinse with cold water until it is cool and well washed. Add salt (if desired) and milk or cream to make it creamier.
For serving ideas, it tastes great with fruit or crackers. Also, you can blend 2 cups of it with 1/4-1/2 c. of yogurt and 2-3 tbsp. seasoning (soup mix is great) for a yummy chip dip.
Well, I tried out a new recipe yesterday--I made cottage cheese out of my food storage. It was so great!! The recipe I had said it would take 6-12 hours to set up, but mine was set and finished in about 3, so it went way faster than I thought it would. I was really surprised by how easy it was! Later that evening, I took it up to my in-laws house, and the entire batch was gone in minutes. With this recipe, the cheese turns out light and fluffy, with curds as large or small as you want them. It's not at all slimy like the stuff from the grocery store.
Cottage Cheese:
2 c. warm water
1/4 rennet tablet (By Jell-O in the stores--the brand is called Junket. Store extras in the freezer for up to 18 months.)
2 c. warm water
2 2/3 c. instant powdered milk (1 1/2 c. non-instant)
1/4 c. buttermilk
1/2 tsp. salt (optional)
milk/cream (optional)
In a medium-large bowl, dissolve rennet in the 2 c. warm water, and set aside. Combine the remaining water, the powdered milk, and the buttermilk. Add the milk mixture to the rennet and stir well. If you want your cheese to set faster, place the bowl with the mixture inside a larger bowl of warm water; if you don't care, just leave it on a counter in a warm room. The cottage cheese is set when it slides around in the bowl but retains its shape. It should have a touch of whey (yellowish-watery stuff) on the edges. When it's set, cut the curd into 1/2 inch squares and set the bowl into a sink (or a bigger bowl) of hot water. Gently stir the curds, breaking them into your desired size, until they are warmed all the way through and have broken into curds and whey. Pour entire mixture into a strainer lined with cheesecloth. Drain and rinse with cold water until it is cool and well washed. Add salt (if desired) and milk or cream to make it creamier.
For serving ideas, it tastes great with fruit or crackers. Also, you can blend 2 cups of it with 1/4-1/2 c. of yogurt and 2-3 tbsp. seasoning (soup mix is great) for a yummy chip dip.
Thursday, September 8
Making Yogurt
Have you ever even heard of making yogurt at home? Up until two weeks ago, the idea never even occurred to me. I always thought yogurt came from a store and that was the end of it.
I have a really cool mother-in-law. She's the type who gets really passionate about food storage and emergency preparedness (she can do incredible things with beans), so when she found a class on how to use powdered milk to do all sorts of crazy recipes (cream cheese, cheesecake, mozzarella... yogurt....) she reserved spots for the whole family. I was completely fascinated by the number of things the teacher could do with powdered milk (which I'd always thought was nasty), and the fact that most of the stuff tasted really good.
So the other day I decided to try making yogurt, and it turned out really well. Here's the recipe I used:
1 1/2 c. warm water
2 1/3 c. instant powdered milk
1/4-1/2 c. plain yogurt (the fresher the better--the cultures die after a while, and your yogurt won't set as well if they're dead. Start can be unflavored yogurt from your last batch!)
2 c. warm water
Blend the 1 1/2 c. warm water and the powdered milk. Add the yogurt and blend again. Add the mixture to 2 c. warm water and pour into small jars. (The yogurt tastes really bitter if you don't add sugar, so I added 1 tbsp. sugar and 1/2 tsp. vanilla per 1 1/2 c. jar. You can add other flavors later.) Set the jars in a cooler or pan full of warm water (between 100 and 120 degrees) and set in a warm place. The yogurt needs to be in that temperature range for about 6 hours (up to 24) in order to set. I put mine in a cooler, and it was ready in a little over 6 hours.
Later I added a little bit of mashed banana and some apricots, and it was incredible. My husband's favorite is applesauce, and we like cherries too. So good! The flavor possibilities are endless--canned or fresh fruits, freezer jams, syrups, etc. Be creative!
Bon appetit!
I have a really cool mother-in-law. She's the type who gets really passionate about food storage and emergency preparedness (she can do incredible things with beans), so when she found a class on how to use powdered milk to do all sorts of crazy recipes (cream cheese, cheesecake, mozzarella... yogurt....) she reserved spots for the whole family. I was completely fascinated by the number of things the teacher could do with powdered milk (which I'd always thought was nasty), and the fact that most of the stuff tasted really good.
So the other day I decided to try making yogurt, and it turned out really well. Here's the recipe I used:
1 1/2 c. warm water
2 1/3 c. instant powdered milk
1/4-1/2 c. plain yogurt (the fresher the better--the cultures die after a while, and your yogurt won't set as well if they're dead. Start can be unflavored yogurt from your last batch!)
2 c. warm water
Blend the 1 1/2 c. warm water and the powdered milk. Add the yogurt and blend again. Add the mixture to 2 c. warm water and pour into small jars. (The yogurt tastes really bitter if you don't add sugar, so I added 1 tbsp. sugar and 1/2 tsp. vanilla per 1 1/2 c. jar. You can add other flavors later.) Set the jars in a cooler or pan full of warm water (between 100 and 120 degrees) and set in a warm place. The yogurt needs to be in that temperature range for about 6 hours (up to 24) in order to set. I put mine in a cooler, and it was ready in a little over 6 hours.
Later I added a little bit of mashed banana and some apricots, and it was incredible. My husband's favorite is applesauce, and we like cherries too. So good! The flavor possibilities are endless--canned or fresh fruits, freezer jams, syrups, etc. Be creative!
Bon appetit!
Subscribe to:
Posts (Atom)