Bet you thought I'd fallen off the face of the earth, huh? Well, not exactly, but things have been a little busy and unfortunately I've been neglecting my blog. There is some rather fun news though. One is that my baby had his first birthday last month, and two is that my husband graduates from university in 3 weeks. Yay! We've got the housing bug bigtime--we can hardly wait to get into our own place. :)
I've been working with several recipes in the meantime, and I've had a lot of success with the originals. The one that I had the most fun with was the sourdough English muffin recipe, so I'll share that one with you first. I tried an English muffin recipe a few months ago, but it tasted so bland without the sourdough zing. So, I bought a start from my local grocery store (if yours doesn't carry packaged start, I'm including instructions for a basic start at the end of this post), found a better recipe, and voi la, perfect English muffins! And yes, you can make these sourdough English muffins entirely from food storage. Unlike most homemade breads, these muffins will keep for at least a week and still taste great.
Sourdough English Muffins
Makes at least 2 dozen (closer to 2-1/2 dozen)
Before you go to bed:
1 c. starter (if yours isn't bubbly enough, and you don't think it will raise bread, use 1 tsp. yeast in addition)
2 tbsp. honey
2 c. reconstituted powdered milk
4 c. all-purpose flour (or 2 c. a-p flour and 2 c. whole wheat flour)
Combine starter, honey, and milk in a large glass or plastic bowl. Stir in flour, 2 c. at a time, until well combined. There's no need to knead--you'll do that later. Spray a little cooking oil over the top of the dough so that it doesn't dry out overnight, cover with plastic wrap and a towel, and let rise overnight.
When you get up:
1 scant tsp. baking soda
2 tsp. salt
1-2 c. all-purpose flour
Cornmeal
Stir down your dough. Sprinkle baking soda and salt over the top, and combine. If the dough is too sticky for kneading, add 1/2 c. flour at this time and work in with a wooden spoon. Once your dough is cohesive enough, turn it out onto a floured board and work in as much flour as you need. When the dough no longer sticks to your hands, knead for five minutes. Pinching the dough should feel like pinching your earlobe.
Lightly flour board again and roll dough to 1/2 inch thick. Use a biscuit cutter or an upside down drinking glass to cut as many rounds as you can. Place cut dough onto a corn-meal-dusted baking sheet. Knead together remaining dough, roll out, cut, and repeat.
When all your muffins are cut, sprinkle the tops with cornmeal, cover with a towel, and allow to rise for about an hour.
Preheat a cast-iron skillet (a non-stick griddle works well too) with a tiny bit of butter over medium-low heat. When the butter sizzles, place as many muffins as will fit on your skillet. Pan-bake for about 4 minutes per side, TURNING ONLY ONCE. When you flip your muffins over, squash them a bit with the spatula so that they cook flatly on the second side.
To serve, insert two forks into the side edge of the muffin and pull the top and bottom apart. This creates the "nooks and crannies" that taste so good when filled with butter. Toast to desired blackness, and smother with butter. Mmmmm!
Original recipe can be found at http://www.sourdoughhome.com.
If you can't find a start, you can make one.
2 c. all-purpose flour
1 tsp. salt
3 tbsp. sugar
1 tbsp. yeast
2 c. lukewarm water
Combine ingredients in a glass or plastic bowl and stir with a wooden or plastic spoon. Do not use metal anything when working with the starter. Once combined, the start should have the same consistency as pancake batter. If it's too runny, add more flour--if too thick, add water. Place a paper towel or piece of cheesecloth over your start and allow it to sit in a warm (about 85 degrees) place overnight. The next day, remove one cup of the liquid and replace with 1/2 c. water and 1/2 c. flour. This is called "feeding your start," and while it's out of the fridge, you'll need to do it every day. Once your start becomes bubbly and has a fermeted, sour odor, you can store it in the fridge and reduce feedings to once a week. The longer you leave it out of the fridge, though, the more flavor your start will develop. Every once in a while, you'll need to pour your start into a fresh container. I use a glass quart jar with a paper towel over the top.
Showing posts with label bread. Show all posts
Showing posts with label bread. Show all posts
Friday, April 7

Monday, February 27
Homemade Soft Pretzels
Friday was another experiment day, but my dad's been in town, so this is the first chance I've had to blog about it. A while ago, I found a recipe for homemade soft pretzels. I wanted to try it, but at the time I didn't have enough time, and I kind of forgot about it after that. Anyway, I found it again last week, and I tried it, and it worked wonderfully. I do have a couple of hints that I should share, though.
#1--When you boil the pretzels, do so in a tall pot with a narrow opening. I boiled mine in a frying pan, and I think there was just too much room. I would recommend using a 2 quart sauce pan.
#2--Bake them until they turn kind of orangy-brown. I baked them as long as the recipe said to, and maybe my oven's not as hot as it says it is, because they were tan, but they didn't have the right texture for soft pretzels. I put them back in for a few minutes, and they came out looking over-done but tasting perfect.
So without further ado, here's the recipe!
Soft Pretzels
Makes 12-24 pretzels, depending on size
1-1/2 tbsp. yeast
2 c. warm water
1/2 tsp. sugar
1 tbsp. salt
4-5 c. bread flour
4 t. baking soda
2 egg whites
coarse salt (for topping)
cinnamon-sugar (for topping)
Dissolve yeast in warm water and let stand for 10 minutes. Add sugar, salt, and flour and knead well, about 10 minutes. Place in a greased bowl and let rise for about 45 minutes, or until double.
Divide into 12-24 pieces, depending on how big you want your pretzels. Roll into a long, narrow rope (about 18 inches) and twist into pretzel shape. Preheat oven to 450 degrees F.
Combine 4 c. water and the baking soda in a 2 qt. saucepan and bring to a boil.
In a small bowl, combine egg whites and 2 tbsp. water.
Drop pretzels in baking soda water one at a time and boil for about one minute. Place on a rack to drain.
Brush tops of pretzels with egg white and top with either coarse salt or cinnamon sugar. Place on a greased baking sheet and bake at 450 degrees F. for 12 minutes, or until shiny and brown.
Original recipe came from Basic Food Preparation: A User's Guide, by Janet C. Stocks.
#1--When you boil the pretzels, do so in a tall pot with a narrow opening. I boiled mine in a frying pan, and I think there was just too much room. I would recommend using a 2 quart sauce pan.
#2--Bake them until they turn kind of orangy-brown. I baked them as long as the recipe said to, and maybe my oven's not as hot as it says it is, because they were tan, but they didn't have the right texture for soft pretzels. I put them back in for a few minutes, and they came out looking over-done but tasting perfect.
So without further ado, here's the recipe!
Soft Pretzels
Makes 12-24 pretzels, depending on size
1-1/2 tbsp. yeast
2 c. warm water
1/2 tsp. sugar
1 tbsp. salt
4-5 c. bread flour
4 t. baking soda
2 egg whites
coarse salt (for topping)
cinnamon-sugar (for topping)
Dissolve yeast in warm water and let stand for 10 minutes. Add sugar, salt, and flour and knead well, about 10 minutes. Place in a greased bowl and let rise for about 45 minutes, or until double.
Divide into 12-24 pieces, depending on how big you want your pretzels. Roll into a long, narrow rope (about 18 inches) and twist into pretzel shape. Preheat oven to 450 degrees F.
Combine 4 c. water and the baking soda in a 2 qt. saucepan and bring to a boil.
In a small bowl, combine egg whites and 2 tbsp. water.
Drop pretzels in baking soda water one at a time and boil for about one minute. Place on a rack to drain.
Brush tops of pretzels with egg white and top with either coarse salt or cinnamon sugar. Place on a greased baking sheet and bake at 450 degrees F. for 12 minutes, or until shiny and brown.
Original recipe came from Basic Food Preparation: A User's Guide, by Janet C. Stocks.
Tuesday, February 7
Homemade Bagel-y Goodness!
I'm so excited about this recipe! I found a recipe for plain bagels last week, and I've been dying to try making bagels since I failed miserably in high school. I made a batch of the plain ones, and they were delicious!! Being the sometimes health-nut that I am, I decided that I'd try and adjust the recipe from corn syrup and white flour to something a little more healthy, and here's what I came up with. I hope you enjoy making (and eating!) these bagels as much as I am!
Honey & Wheat Bagels ala Lindsay
Makes 10 bagels
1 tbsp. yeast
2 c. warm water
3 tbsp. honey
3 tbsp. molasses
2 tsp. salt
1 tsp. oil
3 c. whole wheat flour
2-1/2 to 3 c. white flour (bread flour works well)
3 tbsp. sugar (for boiling bagels)
corn meal for baking
Dissolve yeast in warm water. Add honey and molasses, and let sit for a while until you can see that the yeast is alive and bubbling. In a large mixing bowl, combine yeast, salt, and oil. Add flours alternately a cup at a time (so one cup wheat, one cup white) until you have a dough that adheres to itself. Turn dough out onto a well-floured countertop and knead for 7-9 minutes, adding flour as necessary, until dough is elastic and not tacky. The longer you knead, the better the texture of your bagels.
Place dough in a lightly oiled bowl and turn once to coat. Let rise for about 40 minutes, until dough is double the size. Divide dough into 10 pieces and shape into round discs. Poke a hole in the middle of each one, and pull gently until you have a 1-1/2 (or so) inch hole in the center. Place bagels on a greased baking sheet and let rise again until nearly double (about 20-30 minutes).
When bagels have about 10 minutes left, preheat oven to 400 degrees F and get a sauce pan and fill it about 2/3 full of hot water. Add sugar and bring to a boil. Add bagels, one or two at a time, cover, and boil for 20 seconds. Flip bagels and boil for another 20 seconds. Remove bagels with a slotted spatula and let drain for about 10 seconds before placing them on a VERY WELL CORN-MEALED baking sheet. When you've boiled all the bagels, place them in the oven and bake for 25-30 minutes, until nice and golden brown.
If you have trouble getting them off the baking sheet, wait until they cool down. The bottoms of the bagels pull away from the baking sheet as they cool.
Enjoy!!
Honey & Wheat Bagels ala Lindsay
Makes 10 bagels
1 tbsp. yeast
2 c. warm water
3 tbsp. honey
3 tbsp. molasses
2 tsp. salt
1 tsp. oil
3 c. whole wheat flour
2-1/2 to 3 c. white flour (bread flour works well)
3 tbsp. sugar (for boiling bagels)
corn meal for baking
Dissolve yeast in warm water. Add honey and molasses, and let sit for a while until you can see that the yeast is alive and bubbling. In a large mixing bowl, combine yeast, salt, and oil. Add flours alternately a cup at a time (so one cup wheat, one cup white) until you have a dough that adheres to itself. Turn dough out onto a well-floured countertop and knead for 7-9 minutes, adding flour as necessary, until dough is elastic and not tacky. The longer you knead, the better the texture of your bagels.
Place dough in a lightly oiled bowl and turn once to coat. Let rise for about 40 minutes, until dough is double the size. Divide dough into 10 pieces and shape into round discs. Poke a hole in the middle of each one, and pull gently until you have a 1-1/2 (or so) inch hole in the center. Place bagels on a greased baking sheet and let rise again until nearly double (about 20-30 minutes).
When bagels have about 10 minutes left, preheat oven to 400 degrees F and get a sauce pan and fill it about 2/3 full of hot water. Add sugar and bring to a boil. Add bagels, one or two at a time, cover, and boil for 20 seconds. Flip bagels and boil for another 20 seconds. Remove bagels with a slotted spatula and let drain for about 10 seconds before placing them on a VERY WELL CORN-MEALED baking sheet. When you've boiled all the bagels, place them in the oven and bake for 25-30 minutes, until nice and golden brown.
If you have trouble getting them off the baking sheet, wait until they cool down. The bottoms of the bagels pull away from the baking sheet as they cool.
Enjoy!!
Saturday, January 28
I Actually Won! (Plus a Recipe for Corn Bread)
This is just going to be a short little brag-blog. Our church had a chili cook-off this Thursday, so I whipped up a pot of my trusty chili, and I took 2nd place! They had a bluegrass band and everything, it was so much fun. I love living in a smaller town! We never did things like that in the bigger cities I've lived in.
Anyway, if you want to try some of my Award-Winning Chili, you can find the recipe here.
And just for the fun of it, and because you can't have chili without corn bread, here's my family's favorite best-ever corn bread recipe.
Corn Bread
Makes 9 big pieces
1 c. milk
1/4 c. melted butter
1 large egg
1-1/4 c. cornmeal
1 c. flour
1/2 c. sugar
1 tbsp. baking powder
1/2 tsp. salt
Preheat oven to 400 degrees F. Grease a 9x9" square baking pan. In a medium-sized mixing bowl, combine milk, butter, and egg. In a separate bowl, stir together dry ingredients. Add dry ingredients all at once to milk and egg mixture. Stir just until moistened. Pour into pan, and bake at 400 degrees F for 20-25 minutes, until golden brown.
For a fun variation, you can add canned green chilies and cheddar cheese.
Also, you can bake the corn bread in muffin tins to make individual servings.
Enjoy!
Anyway, if you want to try some of my Award-Winning Chili, you can find the recipe here.
And just for the fun of it, and because you can't have chili without corn bread, here's my family's favorite best-ever corn bread recipe.
Corn Bread
Makes 9 big pieces
1 c. milk
1/4 c. melted butter
1 large egg
1-1/4 c. cornmeal
1 c. flour
1/2 c. sugar
1 tbsp. baking powder
1/2 tsp. salt
Preheat oven to 400 degrees F. Grease a 9x9" square baking pan. In a medium-sized mixing bowl, combine milk, butter, and egg. In a separate bowl, stir together dry ingredients. Add dry ingredients all at once to milk and egg mixture. Stir just until moistened. Pour into pan, and bake at 400 degrees F for 20-25 minutes, until golden brown.
For a fun variation, you can add canned green chilies and cheddar cheese.
Also, you can bake the corn bread in muffin tins to make individual servings.
Enjoy!
Saturday, December 24
For Your Holiday Dinner: Pan Rolls
Would Christmas dinner be complete without homemade rolls? I don't think so. This recipe for pan rolls is great for any time of year, but I especially like it for holiday dinners, like Thanksgiving and Christmas. Including mixing, kneading, rising, shaping, and baking, this recipe takes almost 3 hours, so you'll want to make sure you start it nice and early, so that your rolls will be done in time for dinner.
Pan Rolls
Makes 27 rolls.
2-1/4 tsp. yeast (1 package)
1/3 c. plus 1 tsp. sugar, divided
1-1/2 c. warm water (110-115 degrees), divided
1/2 c. butter or margarine, melted
2 eggs
1/4 c. instant dry milk powder
1-1/4 tsp. salt
5-1/2 to 6 c. all-purpose flour
In a mixing bowl, dissolve yeast and 1 tsp. sugar in 1/2 c. water. Add butter, eggs, milk powder, salt, 3 c. flour, and remaining water and sugar. Beat on medium speed for 3 minutes, until dough is smooth. Stir in enough flour to get a soft dough that leaves the sides of the bowl. Turn onto a floured surface and knead dough until it is smooth and elastic, about 6-8 minutes. Place in a lightly greased bowl, turning once to grease the top. Cover and let rise in a warm place until double, about 1 to 1-1/2 hours. Punch dough down. Divide into 1-1/2 to 2 inch balls (about 27) and shape into rolls. Place about 1/2 inch apart on greased baking pan (any pan with a 2-inch height will work well, though you may need to use two pans). Cover and let rise again until doubled, about 45 minutes. Bake at 375 for 17-20 minutes, until golden brown. Cool on wire racks, and enjoy!
Pan Rolls
Makes 27 rolls.
2-1/4 tsp. yeast (1 package)
1/3 c. plus 1 tsp. sugar, divided
1-1/2 c. warm water (110-115 degrees), divided
1/2 c. butter or margarine, melted
2 eggs
1/4 c. instant dry milk powder
1-1/4 tsp. salt
5-1/2 to 6 c. all-purpose flour
In a mixing bowl, dissolve yeast and 1 tsp. sugar in 1/2 c. water. Add butter, eggs, milk powder, salt, 3 c. flour, and remaining water and sugar. Beat on medium speed for 3 minutes, until dough is smooth. Stir in enough flour to get a soft dough that leaves the sides of the bowl. Turn onto a floured surface and knead dough until it is smooth and elastic, about 6-8 minutes. Place in a lightly greased bowl, turning once to grease the top. Cover and let rise in a warm place until double, about 1 to 1-1/2 hours. Punch dough down. Divide into 1-1/2 to 2 inch balls (about 27) and shape into rolls. Place about 1/2 inch apart on greased baking pan (any pan with a 2-inch height will work well, though you may need to use two pans). Cover and let rise again until doubled, about 45 minutes. Bake at 375 for 17-20 minutes, until golden brown. Cool on wire racks, and enjoy!
Saturday, December 10
Wheat Bread to Warm Your Kitchen and Your Heart
Home-baked bread is another one of those "soul foods" for me. The smell and the taste just make my family and me feel safe, warm, and loved. Lately my husband and I have been on a whole foods kick--trying to cut down on artificial fillers and processed "fake-foods." One of the things I've started to do is make our own bread, and it's been wonderful. I was apprehensive at first; partly because I thought bread took a long time to make, and partly because whenever I'd made wheat bread in the past, it had always turned out dry and crusty. As I was looking through a textbook for my old foods class at BYU, I found a recipe for "Foolproof Wheat Bread" and decided to try it. It was wonderful! It uses vital wheat gluten to make the bread lighter, so it's not so dense and dry. Also, it doesn't need much attention and goes really fast. If you don't have wheat gluten and don't wish to buy any, you can substitute white flour for half of the wheat flour.
Foolproof Wheat Bread
Makes 2 loaves
1 T yeast dissolved in
1/4 c. warm water
2-1/2 c. hottest tap water
2 c. whole wheat flour (we like the taste of red wheat best)
2 T vital wheat gluten
3 T vegetable oil
3 T honey
3 T molasses
1 T salt
2-4 c. additional wheat flour
Optional: cinnamon sugar, raisins, dried apples, nuts, etc.
Dissolve yeast in 1/4 c. warm water. In a large bowl, combine 2-1/2 c. hot tap water, 2 c. wheat flour, and gluten. Add oil, honey, molasses, and salt; beat well. Next, stir in dissolved yeast and enough of the flour to make a soft dough that pulls away from the bowl. Turn on to a floured counter top and knead well for 8-10 minutes, adding flour as necessary. Divide dough into two portions and roll or press into long rectangles. If desired, rub cinnamon sugar onto surface of dough, and sprinkle on raisins, nuts, or dried fruit. (If you don't want to add anything, you can just shape your dough balls into loaves.) Roll dough and pinch the edges closed.
Place dough in greased bread pan, seam side down. Lightly grease top of each loaf, cover loosely with a towel, and let rise in a warm place until not quite double. Bake at 350 for 30-40 minutes, until golden brown. Remove bread from pans immediately; brush tops with butter. Let cool completely before storing in plastic.
Foolproof Wheat Bread
Makes 2 loaves
1 T yeast dissolved in
1/4 c. warm water
2-1/2 c. hottest tap water
2 c. whole wheat flour (we like the taste of red wheat best)
2 T vital wheat gluten
3 T vegetable oil
3 T honey
3 T molasses
1 T salt
2-4 c. additional wheat flour
Optional: cinnamon sugar, raisins, dried apples, nuts, etc.
Dissolve yeast in 1/4 c. warm water. In a large bowl, combine 2-1/2 c. hot tap water, 2 c. wheat flour, and gluten. Add oil, honey, molasses, and salt; beat well. Next, stir in dissolved yeast and enough of the flour to make a soft dough that pulls away from the bowl.
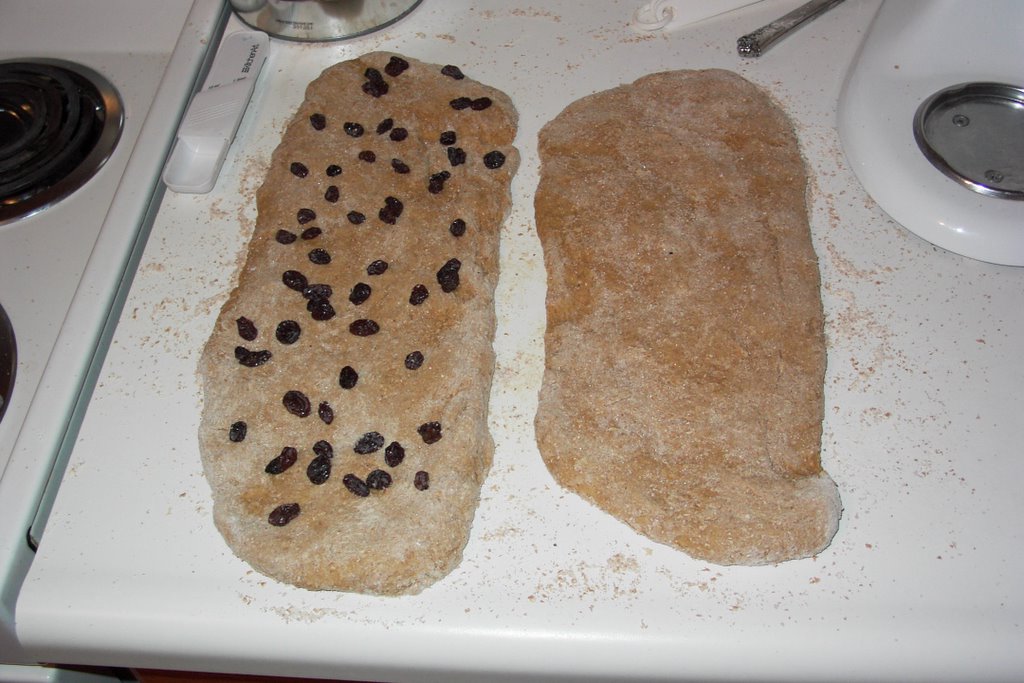 Turn on to a floured counter top and knead well for 8-10 minutes, adding flour as necessary. Divide dough into two portions and roll or press into long rectangles. If desired, rub cinnamon sugar onto surface of dough, and sprinkle on raisins, nuts, or dried fruit. (If you don't want to add anything, you can just shape your dough balls into loaves.) Roll dough and pinch the edges closed.
Place dough in greased bread pan, seam side down. Lightly grease top of each loaf, cover loosely with a towel, and let rise in a warm place until not quite double. Bake at 350 for 30-40 minutes, until golden brown. Remove bread from pans immediately; brush tops with butter. Let cool completely before storing in plastic.
Subscribe to:
Posts (Atom)