These dips are good for any occasion, not just New Years. Hot artichoke dip is great for those who love savory--it's great on baguette slices, crackers, bagels, chips, and vegetables. The sweet and creamy yogurt fruit dip is for sweet-tooths like me. It's delicious on bananas, strawberries, raspberries, mango, pineapple, apples, and pretty much anything else you can think to dip in it. And don't forget to whip up some bean dip; check here for the recipe.
Hot Artichoke Dip
Makes 1-1/2 cups of dip
1/2 c. mayo or ranch dressing (can substitute half of mayo with plain yogurt)
1/2 c. grated parmesan cheese
1/4 c. chopped green onions (about 4 onions)
1-14 oz. can artichoke hearts, drained and coarsely chopped
1-10 oz. package frozen chopped spinach, thawed and drained (optional)
Combine mayo and cheese in a small bowl. Add onions, spinach (if desired) and artichoke hearts. Spoon into 1 qt. microwave/oven safe casserole. Cover and bake at 350 degrees F for 20-25 minutes, or until hot.
If you're microwaving, simply combine all the ingredients in a microwave safe bowl, cover with plastic wrap (folding one edge back 1/4 in. to vent steam), and microwave on med. high for 4-5 minutes, stirring after 2 minutes.
Yogurt Fruit Dip
Makes 2 cups
1-8 oz. package neufchatel cheese, softened (or homemade cream cheese (recipe here))
1-6 oz. container orange yogurt (or homemade yogurt in the flavor of your choice)
1/2 c. orange marmalade (or a different kind of jam in a flavor similar to your yogurt)
1/8 tsp. nutmeg
2 tbsp. coarsely chopped nuts (pecans, walnuts, almonds, etc.)
Beat cream cheese in med. bowl until creamy. Beat in yogurt, marmalade, and nutmeg until smooth. Either serve immediately or refridgerate to allow flavors to blend. Before serving, sprinkle with chopped nuts.
Thursday, December 29
Saturday, December 24
For Your Holiday Dinner: Pan Rolls
Would Christmas dinner be complete without homemade rolls? I don't think so. This recipe for pan rolls is great for any time of year, but I especially like it for holiday dinners, like Thanksgiving and Christmas. Including mixing, kneading, rising, shaping, and baking, this recipe takes almost 3 hours, so you'll want to make sure you start it nice and early, so that your rolls will be done in time for dinner.
Pan Rolls
Makes 27 rolls.
2-1/4 tsp. yeast (1 package)
1/3 c. plus 1 tsp. sugar, divided
1-1/2 c. warm water (110-115 degrees), divided
1/2 c. butter or margarine, melted
2 eggs
1/4 c. instant dry milk powder
1-1/4 tsp. salt
5-1/2 to 6 c. all-purpose flour
In a mixing bowl, dissolve yeast and 1 tsp. sugar in 1/2 c. water. Add butter, eggs, milk powder, salt, 3 c. flour, and remaining water and sugar. Beat on medium speed for 3 minutes, until dough is smooth. Stir in enough flour to get a soft dough that leaves the sides of the bowl. Turn onto a floured surface and knead dough until it is smooth and elastic, about 6-8 minutes. Place in a lightly greased bowl, turning once to grease the top. Cover and let rise in a warm place until double, about 1 to 1-1/2 hours. Punch dough down. Divide into 1-1/2 to 2 inch balls (about 27) and shape into rolls. Place about 1/2 inch apart on greased baking pan (any pan with a 2-inch height will work well, though you may need to use two pans). Cover and let rise again until doubled, about 45 minutes. Bake at 375 for 17-20 minutes, until golden brown. Cool on wire racks, and enjoy!
Tuesday, December 20
Homemade Cream Cheese
This is actually a mock cream cheese, and it's made the same way as homemade yogurt. In taste tests my mother-in-law and I have had, it tastes almost the same as regular cream cheese, and you can use it in all the same recipes--cheese cake, cheese balls, key lime pie, and all the rest. The best part is, it's fat free. To incubate, you can use either a cooler with warm water or a yogurt maker.
Homemade Cream Cheese
Combine:
1-1/2 c. warm water
2 1/2 c. non-instant dry milk powder (5 cups instant)
1/4-1/2 c. plain yogurt with active culture
Add:
2 c. warm water
Pour into containers and cover with lids (use a yogurt maker or canning jars with lids).
If you're using a yogurt maker, set the timer for 12 hours and rotate the jars after 6 hours.
If you're using a cooler, surround jars with warm water, and cover. Replace the water every 2 hours or so to maintain a temperature range between 100 and 120 degrees F.
Makes approximately 6 cups of cream cheese.
Note:
If your cream cheese is too runny, you can drain it by placing the cheese in a strainer lined with cheese cloth or a towel. Just let it sit for as long as it takes to reach your desired consistency.
Holiday Party Food: Cheese Balls
Hello out there!
Christmas Eve parties are just a few days away, and New Year's Eve parties aren't that far away either. Have you started planning your menus? Cheese balls make great appetizers--they're fast and easy to make, and they look and taste impressive. You can make the cheese balls in the recipes below with either store-bought cream cheese or homemade cream cheese (for a recipe for homemade cream cheese, check my next post here). Cheese balls made with homemade cream cheese may not be as firm, but they will still set up and hold their shape, and they taste every bit as good.
Cheddar Cheese Ball
1 c. finely shredded cheddar cheese
1 3 oz. pkg. cream cheese, or 1/2 cup homemade cream cheese
2 T butter
1 T milk
1 T finely chopped green onion
1 T diced pimiento (opt.)
1 tsp. worcestershire sauce
1/2-1/3 c. chopped walnuts or slivered almonds
Bring cheeses and butter to room temperature. Combine in med. sized mixing bowl with milk, onion, pimiento, and worcestershire sauce. Cover and chill for 4-24 hours. Shape mixture into a ball; roll in nuts. Let stand 15 minutes. Serve with crackers or vegetables.
Basic Cheese Ball
1 c. cream cheese
2 tbsp. butter
1 tsp. worcestershire sauce
3/4 tsp. garlic powder
1 tsp. dried minced onion
1/2-1/3 c. chopped walnuts or slivered almonds
Bring cheese and butter to room temperature; combine all ingredients except nuts. Refrigerate 4-24 hours; shape into ball and roll in nuts. Serve with crackers or vegetables.
With this recipe, you're a little more free to experiment. Try adding bacon bits, sun-dried tomatoes, dried garden vegetables, or whatever flavor you want.
Bon Appetit!
Friday, December 16
Christmas Wassail
This is an old family favorite. I got this wassail recipe from my grandma, and it's the best one I've ever seen. The spices need to steep for an hour or more, and they make the entire house smell divine. Oh it's good! I like to keep a little pot of spices simmering even when I'm not making wassail just because it smells so good. The fact that it uses whole spices is nice too, because it means you don't wind up with yucky-tasting dregs at the bottom of your cup.
Cutchen's Christmas Wassail
1 qt. water
2-1/4 c. sugar
10 whole cloves
8 allspice berries
2 sticks cinnamon
2 qts. apple cider
1 qt. orange juice
2 c. lemon juice
Mix water and sugar in a small pot. Boil for 5 minutes. Remove from heat; add cloves, allspice berries, and cinnamon. Let stand for 1 hour or more. Remove spices and transfer sugar-spice water to a large 1-1/2-2 gallon stock pot. Stir in cider, orange juice, and lemon juice. Serve warm.
Wednesday, December 14
7-Layer Cookies
Happy birthday to my mother-in-law!
Ready for some extreme Christmas sweetness? One of my favorite Christmas recipes is this one for 7-layer cookies. It is extremely sweet, and extremely good. They're fast to make and they're a really fun change from the standard sugar and gingerbread cookies on your Christmas cookie platter.
7-Layer Cookies
1/2 c. butter or margarine
1 c. finely-crushed graham crackers
12 oz. butterscotch chips
12 oz. chocolate chips
1 c. flaked coconut
1 can sweetened condensed milk
1 c. chopped walnuts or pecans
Melt margarine and pour into 9"x13" pan. Sprinkle graham crackers over margarine. Sprinkle the chips and the coconut in layers over the graham crackers. Drizzle the condensed milk over the coconut. Sprinkle the nuts over the top. Bake at 300 degrees F for 30 minutes. Cool for at least 30 minutes before cutting and serving.
Monday, December 12
Winter Dinners: Chili and Texas Spaghetti
I was just looking over the recipes I've posted to this blog, and I noticed that there are hardly any meal ideas. I decided it's time to change that, so today I'm blogging on a winter favorite: chili. I found a good basic chili recipe in a cookbook a while ago, and as I usually tend to do with recipes, I adapted it and made it my own. It's chunky and has a stew-like consistency. Feel free to adjust seasonings depending on how hot you like your chili. I like to serve this chili with hot cornbread and cheddar cheese.
Leftover chili is great for Texas spaghetti. I grew up in a suburb of Dallas, and Texas spaghetti was a family favorite. Just cook up some pasta (we like spaghetti or fettucini best) and serve it with chili on top (instead of spaghetti sauce). You can also add cheese, onions, etc. If you don't have leftover chili, you can use cannedchili. That works really well too.
Chili
This recipe serves 4-6
1 lb. ground beef
1 med. onion, chopped
1 clove garlic
1 can diced green chilies
2 14-oz. cans tomatoes
2 8-oz. cans tomato sauce
1 tbsp. chili powder
3/4 tsp. ground cumin
1/2 tsp. red pepper flakes
1/2 tsp. cayenne pepper
1/4 tsp. salt
1/4 tsp. pepper
1 can kidney beans
1 can pinto beans
Cook beef, onion, and garlic in 3-qt. saucepan until beef is browned. Drain off fat. Add all the other ingredients except the beans. Heat to boiling; reduce heat to low. Cover and simmer for about an hour (to blend flavors), stirring occasionally.
Stir in beans. Heat to boiling, reduce heat. Simmer uncovered for another 10 minutes, until the beans have warmed through and the chili reaches your desired thickness.
Saturday, December 10
Wheat Bread to Warm Your Kitchen and Your Heart
Home-baked bread is another one of those "soul foods" for me. The smell and the taste just make my family and me feel safe, warm, and loved. Lately my husband and I have been on a whole foods kick--trying to cut down on artificial fillers and processed "fake-foods." One of the things I've started to do is make our own bread, and it's been wonderful. I was apprehensive at first; partly because I thought bread took a long time to make, and partly because whenever I'd made wheat bread in the past, it had always turned out dry and crusty. As I was looking through a textbook for my old foods class at BYU, I found a recipe for "Foolproof Wheat Bread" and decided to try it. It was wonderful! It uses vital wheat gluten to make the bread lighter, so it's not so dense and dry. Also, it doesn't need much attention and goes really fast. If you don't have wheat gluten and don't wish to buy any, you can substitute white flour for half of the wheat flour.
Foolproof Wheat Bread
Makes 2 loaves
1 T yeast dissolved in
1/4 c. warm water
2-1/2 c. hottest tap water
2 c. whole wheat flour (we like the taste of red wheat best)
2 T vital wheat gluten
3 T vegetable oil
3 T honey
3 T molasses
1 T salt
2-4 c. additional wheat flour
Optional: cinnamon sugar, raisins, dried apples, nuts, etc.
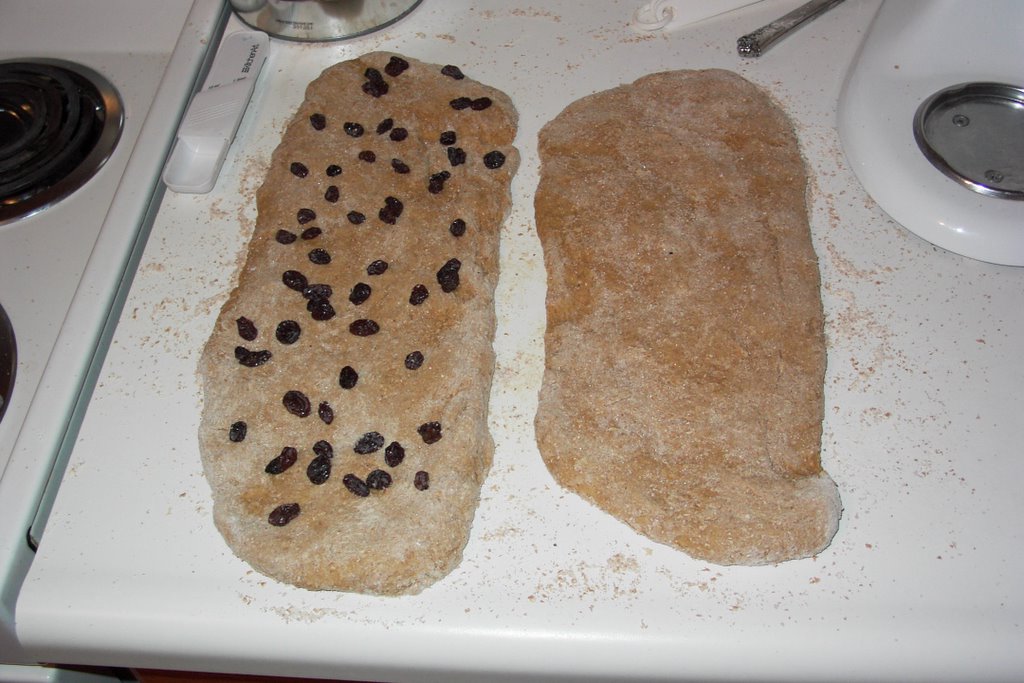
Dissolve yeast in 1/4 c. warm water. In a large bowl, combine 2-1/2 c. hot tap water, 2 c. wheat flour, and gluten. Add oil, honey, molasses, and salt; beat well. Next, stir in dissolved yeast and enough of the flour to make a soft dough that pulls away from the bowl. Turn on to a floured counter top and knead well for 8-10 minutes, adding flour as necessary. Divide dough into two portions and roll or press into long rectangles. If desired, rub cinnamon sugar onto surface of dough, and sprinkle on raisins, nuts, or dried fruit. (If you don't want to add anything, you can just shape your dough balls into loaves.) Roll dough and pinch the edges closed.
Place dough in greased bread pan, seam side down. Lightly grease top of each loaf, cover loosely with a towel, and let rise in a warm place until not quite double. Bake at 350 for 30-40 minutes, until golden brown. Remove bread from pans immediately; brush tops with butter. Let cool completely before storing in plastic.
Foolproof Wheat Bread
Makes 2 loaves
1 T yeast dissolved in
1/4 c. warm water
2-1/2 c. hottest tap water
2 c. whole wheat flour (we like the taste of red wheat best)
2 T vital wheat gluten
3 T vegetable oil
3 T honey
3 T molasses
1 T salt
2-4 c. additional wheat flour
Optional: cinnamon sugar, raisins, dried apples, nuts, etc.
Dissolve yeast in 1/4 c. warm water. In a large bowl, combine 2-1/2 c. hot tap water, 2 c. wheat flour, and gluten. Add oil, honey, molasses, and salt; beat well. Next, stir in dissolved yeast and enough of the flour to make a soft dough that pulls away from the bowl.
 Turn on to a floured counter top and knead well for 8-10 minutes, adding flour as necessary. Divide dough into two portions and roll or press into long rectangles. If desired, rub cinnamon sugar onto surface of dough, and sprinkle on raisins, nuts, or dried fruit. (If you don't want to add anything, you can just shape your dough balls into loaves.) Roll dough and pinch the edges closed.
Place dough in greased bread pan, seam side down. Lightly grease top of each loaf, cover loosely with a towel, and let rise in a warm place until not quite double. Bake at 350 for 30-40 minutes, until golden brown. Remove bread from pans immediately; brush tops with butter. Let cool completely before storing in plastic.
Wednesday, November 30
Pumpkin Recipes!
When I was a kid, I thought it was so silly to carve pumpkins, leave them outside until they got moldy, and then throw them away. When I moved out, I made it a tradition to carve my pumpkin the day before Halloween, and then on the day after Halloween, I cut it up, cooked it, mashed it, and used the mush in my pumpkin recipes. I've been doing this for three years now, and now my husband's family is doing it, too. I should have written this post earlier so that all of you could use your carved-up Halloween pumpkins, but I just didn't think about it. Oh well. Canned pumpkin is cheap this time of year, so I thought it would still be worth-while to share some of my favorite pumpkin recipes.
Pumpkin Pie
This pumpkin pie is rich and spicy, and goes perfectly with whipped cream or vanilla ice cream. If you're making it with homemade mashed pumpkin, use about 3-1/2 cups.
two single-crust pie crusts (See my post on pie crusts)
1 29-oz. can pureed pumpkin
1-1/2 c. brown sugar
1-1/2 tsp. cinnamon
1-1/2 tsp. ginger
1/2 tsp. nutmeg
1/2 tsp. cloves
1/2 tsp. salt
6 eggs, well beaten
2-2/3 c. milk, or 2 cans evaporated milk
1 tsp. vanilla
Heat oven to 450 degrees F. Cream pumpkin, sugar, spices, and salt. In a separate bowl, mix eggs, milk, and vanilla. Pour egg mixture into pumpkin mixture; stir well. Pour carefully into two 9" pie shells--be sure that when you flute the crust, you flute the edge upright so that it helps to keep the pumpkin mixture from spilling out. Cover edge of crust with a pie crust shield (you can either make one out of aluminum foil or you can buy one here). Bake at 450 for 15 minutes, then reduce heat to 350 degrees and bake for another 40-45 minutes, or until knife blade inserted near the center comes out clean.
Pumpkin Butter
This makes a great homemade gift for neighbors and friends. It's called butter because it's smooth and creamy, not because it has butter in it. It tastes great on toast, muffins, ice cream, in smoothies... you name it.
1 29-oz. can pureed pumpkin
3/4 c. apple juice
2 tsp. ginger
1/2 tsp. cloves
2 tsp. cinnamon
1 tsp. nutmeg
1-1/2 c. white sugar
Combine all ingredients in a large saucepan and stir well. Bring mixture to a boil. Reduce heat; simmer for 30 minutes, or until thickened. Stir frequently to keep mixture from burning and sticking to the bottom of the pan.
Spoon hot pumpkin mixture into half or full pint jars, leaving 1/4" head space. Remove air bubbles and wipe jar rims. Cover immediately with lids and screw the bands on.
Process in a boiling water bath or a steam canner for 10 minutes.
For a decorative touch, you can cut out circles of holiday fabric to go over the lids. You can also tie a ribbon around the neck of the jar. Get creative! :)
I have a couple more recipes, but this post is already pretty long, so you'll have to let me know if you want recipes for pumpkin bread or pumpkin chocolate chip cookies.
Enjoy!
Wednesday, November 23
Cooking with Cranberries
Today's post is by special request, just in time for Thanksgiving. Up until last year, I'd always had canned cranberry sauce for Thanksgiving dinner. I thought there was some huge secret to making cranberry sauce from scratch, because my mom never made any. The truth is, it's very simple to make, and the only reason Mom never made it is that we rarely ate turkey for Thanksgiving. So today, along with my recipe for cranberry sauce, I'll share a couple of other fun recipes for cranberries that'll be great for this holiday season.
Cranberry Sauce:
1 c. sugar
1 c. water
1 pkg. (12 oz.) fresh cranberries
Combine water and sugar in a medium saucepan. Bring to a boil, and add cranberries. Reduce heat and boil gently for about 10 minutes, stirring frequently and gently smashing the berries as they become ready to pop. Cover and cool completely at room temperature. Refrigerate until serving time. This sauce is great when made a day-ahead!
Cranberry Nut Bars:
2 eggs
1 c. sugar
1 c. flour
1/3 c. butter or margarine, melted
1 1/4 c. cranberries (fresh or frozen)
1/2 c. chopped walnuts
Heat oven to 350 degrees F. Grease an 8" baking pan. Beat eggs in medium mixing bowl until thick and frothy. Gradually add sugar, beating until thoroughly blended. Add flour and melted butter; blend well. Using a wooden spoon, fold in cranberries and nuts just until combined. Spread evenly in pan. Bake for 40-45 minutes, or until golden brown. Cool and cut into bars. Serves 16.
Cranberry Apple Bread:
from the Ocean Spray Homepage
2 cups peeled, chopped apple
3/4 cup sugar
2 tablespoons oil
1 egg
1 1/2 cups flour
1 1/2 teaspoons baking powder
1/2 teaspoon baking soda
1 teaspoon cinnamon
1 cup Ocean Spray® Fresh or Frozen Cranberries
1/2 cup chopped walnuts
Preheat oven to 350ºF. Grease an 8 1/2 x 4 1/2 x 2 1/2-inch loaf pan.
Combine apples, sugar and oil in a medium mixing bowl. Add egg, mixing well. Combine dry ingredients in a separate mixing bowl. Add to apple mixture, mixing just until the dry ingredients are moist. Stir in cranberries and walnuts.
Spread batter evenly in loaf pan. Bake for 1 hour or until a toothpick inserted into the center of the bread comes out clean. Makes 1 loaf.
Thursday, November 17
Holiday Cooking Tip #1--Gravy and Apple Pie with Ultra Gel
Thanksgiving is next week! I can hardly believe it's so close. My parents are paying for my husband, son and me to come visit them in Oregon, and we're all very excited. It's always fun to get involved in all the holiday cooking. I took a foods class at BYU just before I graduated, and I think that of all the classes I took, that one has been one of the most useful. My teacher was Janet Stocks, and she and her family are the creators of Ultra Gel, an instant food starch.
Here are a couple of the benefits of using Ultra Gel:
1. It's instant--you just mix it in with whatever needs to be thickened, and voila, it's done. Not like regular cornstarch, where you have to heat it to boiling before it'll thicken things.
2. It doesn't clump. Add it to hot things, cold things, whatever--no mixing rouxs or slurries.
3. Doesn't congeal or separate in the fridge. Your left-over gravy will look just like it did when you put it away--like sauce, not like something the cat threw up.
4. Improves texture of baked goods and reduced calorie soups, sauces, and salad dressings. It makes baked goods fluffier and soups and sauces creamier.
They have lots of recipes on their website, and an additional book of recipes that you can purchase for $9.
Here are two of my favorite recipes using Ultra Gel:
Gravy:
1 14-oz. can chicken or beef broth
1-2 t. bouillon granules (opt.)
1/3 c. Ultra Gel
Add bouillon to broth and heat in microwave or on range to dissolve. Gradually add Ultra Gel, stirring constantly with wire whisk. Heat to serving temperature, season to taste, and serve.
Apple Pie:
6 c. peeled apples sliced 1/4" thick
1 pkg. spiced cider mix (makes 1 cup)
2/3 c. sugar
1/3 c. Ultra Gel
1 t. cinnamon
1/2 t. nutmeg
1 c. water
Blanch apples by placing in microwave safe bowl, covering with waxed paper, and microwaving on high for 10 minutes, stirring once.
Combine cider mix, sugar, Ultra Gel, cinnamon and nutmeg. Gradually add water, stirring constantly with wire whisk. Fold into prepared apples.
For apple cream pie, turn prepared filling into baked 9" pie crust and chill. Top with sweetened whipped cream.
For baked apple pie, turn prepared filling into unbaked 9" pie crust. Cover with aditional 9" pie crust, pricking as desired. Bake at 400 F for 35-40 minutes.
Monday, November 14
Hot Cereal for Cold Mornings
All of a sudden it's winter! Utah's a funny place. One day it's 65 degrees and you're outside in your shorts, and the next it's 38 and you're freezing your bum off. I really love the different seasons though. It's nice to have some variety.
One thing I love about winter mornings is a hot breakfast. But if you're like my husband, who is defintely not a morning person, you usally don't have much time for one. The recipe I'm going to share today is a mix for a wholesome hot cereal that doesn't take much time to prepare, and is really good for you. It's made using equal parts cracked wheat, rice, and beans, so it's got plenty of carbohydrates, dietary fiber, and protein. The recipe here makes 6 cups (about 24 servings), but since it uses equal parts, it's easy to adjust to as much as you want. This cereal tastes a lot like cream of wheat.
Cream of Beans Cooked Cereal:
Using a grinder, crack (coarsly grind) 2 cups each of wheat, brown rice, and white beans.
To prepare cereal:
1. Heat 2 c. milk or water (don't overheat the milk--it'll boil over!)
2. Add 1/2 c. cereal mix and 1/4 tsp. vanilla; whisk well.
3. Simmer until thick, stirring frequently.
4. Serve with honey, brown sugar, raisins, cinnamon, etc.
Bean flour, if you grind it fine, can also be used as a substitute for up to 25% of the white flour in most baking or sauce recipes. This adds a lot of nutritional value without changing the flavor or texture. Beans are a great addition to food storage because they are high in protein, fiber, and lots of other nutrients, and can be prepared so many different ways and adapt to so many different flavors. They make a great substitute for meat, and can be used in all sorts of recipes.
Friday, October 28
Guacamole Bean Dip
Hey Everyone!
It's time for another party recipe--this time it's for a bean spread that you can use all sorts of ways. I like it in tortillas (like a burrito), sandwiches (with lettuce and tomato and cheese), pita bread, crackers, or on tortilla chips. It tastes a lot like guacamole, but it's got beans in it, so it's a great source of protein and fiber.
Guacamole Bean Spread:
1 can white beans (great northern or garbanzo)
1 large avocado
1/4 c. ranch dressing (or mayo)
1 tsp. dried onion
1 tsp. lemon juice
2 tbsp. salsa
Place all of the ingredients in a food processor or blender. Process until smooth. If you're using a blender, add the beans a little at a time.
Tuesday, October 25
Fantastic Caramel Corn
In the mood for a sweet, crunchy snack? My husband and I made a batch of this caramel corn last night, and it was wonderful. It's great for parties, kids, and all sorts of get-togethers because it's quick to make and quickly eaten. This recipe isn't very good for making popcorn balls--it's crunchy and meant to be eaten from a bowl.
Caramel Corn
From start to finish, about 45 minutes.
7-8 c. plain popped popcorn
3/4 c. packed brown sugar
6 tbsp. butter
3 tbsp. light corn syrup
1/4 tsp. baking soda
1/4 tsp. vanilla
flavored Jell-O mix (optional)
raw Spanish peanuts (optional)
Preheat oven to 300 degrees F.
Remove all unpopped kernels from popcorn. Put popcorn into an ungreased 17x12x2 baking pan.
In a medium saucepan, combine brown sugar, butter, and corn syrup. Cook and stir over medium heat till mixture boils. Continue boiling at a moderate rate, without stirring, for 5 minutes more.
Remove pan from heat. Stir in baking soda and vanilla. Pour mixture evenly over popcorn--if desired, sprinkle Jell-O mix on top and/or add peanuts; stir gently to coat. Bake in 300 degree oven for 15 minutes. Stir mixture, bake 5 minutes more. Spread caramel corn on a large piece of buttered foil to cool, or place directly in serving bowls.
Friday, October 21
Homemade Mozzarella Cheese!
This is it! The big one! The one you've all been waiting for. In today's blog, I'm going to teach you how to make mozzarella cheese at home--from your food storage! The recipe calls for 2 c. half and half, but if you're making it from food storage, use boxed whole milk. It's in the juice aisle, and the box it comes in looks like a juice box. Use two juice boxes per recipe of cheese. You can also use 1-1/2 c. olive oil, but your cheese won't be white. It'll be kind of an off-white. It'll still taste good though. The recipe sounds intimidating, but it only takes a little over half an hour, and it really is quite simple. This recipe makes approximately 3/4 a pound of cheese.
Tools:
Large stainless steel stock pot
Meat or dairy thermometer (one that goes down to at least 70 degrees F)
CALIBRATE YOUR THERMOMETER FIRST!
Slotted spoon
Rubber gloves (like the kind you use for cleaning, only make sure they're only used for food)
Microwave
Ingredients:
1/2 Rennet Tablet (near the Jell-O and Custard; the brand is Junket)
1/4 c. bottled water (non-chlorinated
1 gallon reconstituted dry milk, minus 2 cups (after you mix the milk, let it sit out for a few hours so the flavor can blend)
2 c. half-and-half (not fat free!)
2 tsp. citric acid (you can find this at a health-food store or a pharmacy)
1-2 tsp. non-iodized salt (also called cheese salt or canning salt)
Steps:
1. Crush 1/2 rennet tablet in 1/4 c. cool, non-chlorinated water.
2. In a large stainless steel pot, combine the milk (minus the two cups!) and the half and half. Turn heat to medium.
3. Sprinkle 2 level tsp. citric acid into the milk and stir gently using the slotted spoon. Slowly heat milk to 88 degrees F. You will start to see your milk curdle.
4. Once your milk has reached 88 degrees F, add the dissolved rennet. Continue stirring slowly every few minutes until the milk reaches 105 degrees F. Remove from heat. At this point, you should have some chunky or stringy curds. If your curds aren't huge, let them sit for a while, and they'll get bigger.
5. The milk will separate into white curds and yellowish-green whey. Once it does this, you can scoop the curds out into a microwave-safe bowl or pour into a strainer lined with cheese cloth. Pour off as much of the whey as you can.
6. Microwave the curds on high for 1 minute, drain off excess whey. Knead cheese with your hands--make sure to use your gloves--until cool. While you're kneading, you can add your 1-2 tsp. salt.
7. Put cheese back in the microwave, heat on high for 35 seconds, knead, and repeat. Cheese is done when it is shiny and stretches like taffy.
If you're creative and you like string cheese, you can shape it into rods or other shapes and eat it just like string cheese. It's also great on crackers, lasagna, or wherever else you use cheese. It melts just like the stuff you buy from the store. And be sure to tell all your friends you made your own cheese--they'll be amazed!
Tuesday, October 18
Perfect Homemade Pie Crust
Happy Birthday Mom!
Something about the orange and red leaves crunching everywhere made me crave pumpkin pie last weekend. I love fall! Now that we're nearing the biggest baking season of the year, it's time for me to start sharing some of my favorite baking tips and recipes. The one item I get the most compliments on is my homemade pie crust. It's always flaky, always tender, always delicious, and it's not even all that hard. The recipe looks long and complicated, but that's just because I'm verbose (my degree IS in English literature, after all). It's really quite simple; here's how it's done:
Lindsay's Perfect Homemade Pie Crust:
(makes 2 single-crust pies or 1 double-crust pie)
2 c. all-purpose flour
1/2 tsp. salt
1 c. butter-flavor shortening
Ice water
In a mixing bowl, combine flour and salt. Line a 1-cup measuring cup with saran wrap and fill with shortening (this makes clean-up so much easier!); add to flour mixture. Dust hands with flour (be sure to remove rings first!) and gently break up the shortening, leaving marble-sized chunks. You can also do this with criss-crossing knives or a pastry cutter, but be sure to leave big chunks, because they're what make the dough flaky. Sprinkle 1-2 Tbsp. of ice water at a time, tossing dough with fork to mix. When dough begins to clump, add more water to the next section. You should need about 6-8 Tbsp. of water. When dough is soft and clumpy, form it into a ball and break into two halves. Flatten each half into a disc about 1/2 - 1 inch thick, wrap in plastic wrap, and refrigerate for about 10 minutes. This makes it sooo much easier to roll!
When dough has chilled, roll it out on a floured surface. This is always where I messed up before, but there are tips to avoid messed-up pie crusts. My secret is a canvas rolling mat and a cotton rolling-pin sock. I found them at a grocery store in Provo, and they have worked wonderfully. You just rub flour into the canvas and on the sock, and then roll it out. If you do it on a counter top, be sure to flip the dough every so often and re-flour the surface so that you don't wind up with dough that can't be pried off of the counter. When the dough is the right size and thickness, fold it in half or quarters and gently place it into the pie plate before you unfold it.
For pumpkin pie, or other liquid fillings, trim the crust about half an inch from the plate. Fold the crust so that it sticks up off the rim of the plate, and flute. Cover edges of crust with aluminum foil or tin pie crust shields (I have two; they're great) so that the crust doesn't burn. If the crust has to be pre-baked, poke holes in it and if you have clean marbles, place 3 or 4 in the bottom of the crust to keep it from rising. Bake at 400 degrees F for about 8-10 minutes.
For double crust pies, trim the bottom crust even with the pie plate, but make sure that the top crust is about half an inch wider. Fold the top crust around the bottom crust, then crimp. Be sure to cut slits in the top before it is placed in the oven. Spray or brush with milk, then sprinkle with coarse sugar. Cover edges of crust with aluminum foil or tin pie crust shields so that the crust doesn't burn.
Happy baking!
Friday, October 7
Disc-O-Matic!
One thing about me is that I like to keep busy. And I don't like to spend my life cleaning. Two things about me are that I like to keep busy and I don't like to spend my life cleaning, and I like to try new things. (No one expects the Spanish Inquisition!) Anyway, this week's experiment has been not in the kitchen, but behind the needle of my 1958 White Disc-O-Matic Sewing Machine! It's a hand-me-down from my grandma, and the thing is built like a tank. It's been sitting on a storage shelf in my apartment for the last 9 months or so (and in storage at my grandma's for the last 20 years), but apparently it still works perfectly.
So long story short, instead of a big cooking project, I decided to make a duvet cover for our down comforter! Mike and I went to Joann's Fabric for our date last night, and we picked out fabric for the duvet, plus two big European pillow forms and fabric for shams. Sewing this duvet cover has been such a great learning experience for me. The last time I used a sewing machine I was 15 and my mom was doing most of the work, so I am a complete novice. So far I've been doing pretty well though--I stitched together three big panels to create the top cover (we have a king-sized bed, so it's a huge duvet), and trimmed the 108"-wide muslin bottom cover. I'm about ready to go stitch the top to the bottom, and then all that's left after that is the hemming and the buttons. I'm a little nervous about sewing button holes with a 47-year-old machine, but I'm sure I'll figure it out somehow. My grandma kept the instructions, and she still had all the attachments; I don't know how she did it, but I'm grateful!
The instructions for sewing your own duvet cover can be found here. There are a bunch of other "around-the-house" type project instructions there too. I never knew Waverly had so many patterns and instructions on their website!
If you have any tips or comments, please feel free to share! Like I said, it's been forever since I've sewn anything, so I can use all the help I can get.
Monday, October 3
Hinckley's Exhortation, and Canning Tomatoes
What an incredible conference that was! My husband and I have made a resolution to step-up our emergency preparedness efforts. We live in a tiny two-bedroom apartment, and there's definitely not enough room for a one-year supply of everything we need, but we're going to do our best. We stocked up on hygiene items (shampoo, soap, conditioner, toilet paper, paper towels, etc.), and we bought vinyl pants and diaper pins in case I have to resort to cloth diapers (heaven forbid!) for our 6-month-old. Mike's parents said they've got enough food stored for us, so if it should come to that, at least we know we could move in with his parents and younger siblings.
In addition to hygiene items, it's a really good idea to stock up on medicines. They're expensive to buy all at once, but think about how many times you or a family member gets sick or hurt over the course of a year. You want to be sure to stock up on vitamins (rotate these as often as you can though--they don't last more than a couple years), pain killers, antibiotics, and any prescriptions you take. My mother-in-law studies herbal remedies, and there are herbs out there that can do incredible things. If anyone's interested on a post about herbal wonders, let me know, and I'll talk to my mother-in-law about good herbs to store and what they're for, and what quantities you'll need.
Enough about that for now. If anyone wants another post on emergency storage, let me know, and I'll do it. Last week I promised I'd post on canning tomatoes, so here goes.
I researched tomato canning on the web last week, and I found so many recipes that I didn't know where to start. I decided though that I just wanted plain old tomatoes, so I packed quartered tomatoes in water and used a steam canner. Here's the procedure I used:
Equipment:
Tomatoes
Lemon juice
Salt
Canning jars--pint or quart (mouth size doesn't matter)
New (cleaned) lids
Band for each jar
Funnel
Ladle
Steam canner
Jar tongs
1. Clean jars in dishwasher; make sure jars are hot, and don't take them out until you're ready to pack them.
2. Boil two pots of water: one for blanching, one for hot water pack.
3. Clean tomatoes. Place in large bowl.
4. Pour boiling water over tomatoes. Let the tomatoes sit in the hot water until their skins split.
5. Pour out the hot water and remove the skins from the tomatoes.
6. Remove the stem core. At this point, you can either leave the tomatoes whole or cut them into quarters or halves.
7. Pack tomatoes in jars.
8. Add 1/2 tsp. salt (preserves color, adds flavor) and 1 Tbsp. lemon juice for pint jars, 1 tsp. salt and 2 Tbsp. lemon juice for quart jars.
9. Using a ladle and a funnel, pour water into jars, leaving 1/2 inch headspace in pint jars, 1 inch in quart jars.
10. Wipe off necks and rims of jars using a warm wet paper towel.
11. Place lids over each jar, then screw on the bands.
12. Pour hot water in steam canner. Place filled jars on rack of canner.
13. Place the lid over the canner and jars, and turn stove on medium high heat. When the steam escapes in a steady stream, start timing. Tomatoes need to process 40 minutes for pint jars, and about 45 minutes for quart jars.
14. When the tomatoes have processed for the correct amount of time, carefully raise the lid, being sure to open it away from your face so you're not burned by the escaping steam.
15. Using the jar tongs, remove the jars and place them on a towel on your counter top to cool. The lids won't seal correctly until the jars have cooled completely.
It was so exciting for me when I found out that my jars had sealed and the whole thing had worked. I've only ever canned with my mother-in-law, so even though I've done it lots of times, I've never done it by myself. There's a real sense of satisfaction and achievement when you can grow and preserve your own food storage.
Thursday, September 29
Mmmm, Chocolate Cake....
I was going to post yesterday, but I was just way too busy. My cousin invited my son and me to a Kinder-Sing party--a bunch of mommies singing to their babies. It was really weird at first to be in a group of mostly-older women and singing silly songs to a bunch of wriggly babies, but it was fun anyway. Then I got to meet up with one of my old roommates and good friends who just got back from serving an LDS mission in Argentina. It was so great to see her again! I also got to give my grandma the 30-page transcription of her life history that I'd been working on. There's still lots more to do, but she was really grateful for what I've done so far.
Anyway, back to the cake. I've got to figure out a way to make chocolate cake from my food storage. It's one of those comfort foods, y'know? I found this recipe for Milk Chocolate Bundt Cake in an old Taste of Home magazine, so I can't take the credit. You don't need cake flour for this recipe--the cake is light and moist enough with regular all-purpose flour. Without further ado, here's the recipe:
Milk Chocolate Bundt Cake
7 oz. milk chocolate
1/2 c. chocolate syrup
1 c. butter or margarine (softened)
1-1/2 c. sugar
4 eggs
1 tsp. vanilla extract
2-3/4 c. all-purpose flour
1/2 tsp. salt
1/2 tsp. baking soda
1 c. buttermilk
powdered sugar, optional
Prepare Bundt pan by greasing and flouring it. Preheat oven to 350 degrees F. In a saucepan, melt the milk chocolate with the chocolate syrup over low heat, stirring frequently; set aside to cool. In a large mixing bowl, cream the butter with the sugar. Beat in eggs, one at a time. Stir in chocolate mixture and vanilla. In a separate bowl, combine dry ingredients. Add flour mixture and buttermilk alternately to cake batter. Pour into prepared Bundt pan. Bake at 350 degrees for 60-65 minutes, until a toothpick inserted near the center comes out clean. Cool in pan on a wire rack for 15 minutes, then remove cake from pan and cool completely. You can then dust it with the powdered sugar as a garnish. This cake doesn't really need icing, but you can make a glaze for it if you want.
I'm going to try to can some tomatoes this weekend between sessions of the LDS General Conference, so check back later for a how-to guide on canning tomatoes. I'll also be making cinnamon rolls, so if you want a recipe for those, let me know and I'll blog about the one I use.
Friday, September 23
Delicious Cottage Cheese
Hello out there!
Well, I tried out a new recipe yesterday--I made cottage cheese out of my food storage. It was so great!! The recipe I had said it would take 6-12 hours to set up, but mine was set and finished in about 3, so it went way faster than I thought it would. I was really surprised by how easy it was! Later that evening, I took it up to my in-laws house, and the entire batch was gone in minutes. With this recipe, the cheese turns out light and fluffy, with curds as large or small as you want them. It's not at all slimy like the stuff from the grocery store.
Cottage Cheese:
2 c. warm water
1/4 rennet tablet (By Jell-O in the stores--the brand is called Junket. Store extras in the freezer for up to 18 months.)
2 c. warm water
2 2/3 c. instant powdered milk (1 1/2 c. non-instant)
1/4 c. buttermilk
1/2 tsp. salt (optional)
milk/cream (optional)
In a medium-large bowl, dissolve rennet in the 2 c. warm water, and set aside. Combine the remaining water, the powdered milk, and the buttermilk. Add the milk mixture to the rennet and stir well. If you want your cheese to set faster, place the bowl with the mixture inside a larger bowl of warm water; if you don't care, just leave it on a counter in a warm room. The cottage cheese is set when it slides around in the bowl but retains its shape. It should have a touch of whey (yellowish-watery stuff) on the edges. When it's set, cut the curd into 1/2 inch squares and set the bowl into a sink (or a bigger bowl) of hot water. Gently stir the curds, breaking them into your desired size, until they are warmed all the way through and have broken into curds and whey. Pour entire mixture into a strainer lined with cheesecloth. Drain and rinse with cold water until it is cool and well washed. Add salt (if desired) and milk or cream to make it creamier.
For serving ideas, it tastes great with fruit or crackers. Also, you can blend 2 cups of it with 1/4-1/2 c. of yogurt and 2-3 tbsp. seasoning (soup mix is great) for a yummy chip dip.
Monday, September 19
Italian Chicken a la Me
Hey out there!
I don't know about you guys, but chicken is one of my favorite foods to experiment with. It has such a neutral flavor that you can play around with all sorts of spices and learn about all kinds of flavors and combinations. I was feeling creative last night, and I came up with a new chicken dish that my husband and I both loved.
One good way to use up stuff you have a lot of is to experiment. That way, if it turns out poorly, no big deal! You have tons more anyway, so no harm done. On the flip side, if it turns out really well, you can make lots more. As you can tell from my previous post, we have TONS of tomatoes. We also had a lot of garlic, so I experimented with chicken, garlic, and tomatoes. Mmmmmm!
There are only two of us in my family, so you can easily double or triple it depending on how many people you need to serve.
Italian Chicken:
2 large-ish chicken breasts
2-3 Tbsp. olive oil
1 big clove garlic, minced
1/2 tsp. ground parsley, 1 Tbsp. chopped fresh
1/2 onion, sliced in rings
1 tomato, sliced in discs
In a 3 qt. sauce pan, combine olive oil and minced garlic while chicken is defrosting. Heat oil and garlic, then add parsley and onion. Saute until onion is tender. Add chicken, then cover the pot and cook for a while on low, until chicken appears mostly cooked. Then, remove lid and add tomato slices. Cook chicken with tomato slices on medium high heat until the chicken is golden brown on both sides.
I served this chicken with a simple rice pilaf (basically it's sauteed rice cooked in chicken broth), but I bet it would taste good with just about any carbohydrate-rich side dish.
If any of you out there have any other good recipes to share, feel free to leave them in the comments section!
Friday, September 16
Too Many Tomatoes--Salsa & Salad!
We live in a little rental in the back of someone's house, and the owners have a garden out back. They grow a green beans, squash, chard, and TONS OF TOMATOES. They have so many tomatoes that they can't give them all away! Anyway, they gave us 2 huge sacks of tomatoes, and it became my job to figure out what to do with them before they went bad.
For those of you who haven't tasted a home-grown tomato, you're really missing out. I tried my first one last year from my in-laws' garden, and oh man was it good. It's crazy how much different they taste when they're picked ripe instead of being picked green and ripening in a box.
Anyway, I have a couple of ideas for people with too many garden tomatoes.
Number one is a Russian favorite that my husband picked up during his 2 years in Russia:
Tomato and Cucumber Salad
3 large-ish tomatoes
1 cucumber
vinegar and salt to taste
Cut up the tomatoes and cucumbers into small, bite-sized pieces, and toss in medium mixing bowl. Add enough vinegar to coat vegetables, and about half a teaspoon salt (more if you're a big sodium fan). Toss and enjoy!
So Good Salsa
Word of warning--be careful with the chilies--they'll burn your fingers if you don't wear gloves.
3 cups chopped tomato (about 3 really big ones)
1/2 cup bell pepper (one small one)
1/2 cup sliced green onions (or white, or red, or whatever you like best!)
3 cloves garlic, finely chopped
2 tbsp. chopped fresh cilantro
1 tbsp. finely chopped jalapeno chilies (be sure to remove the seeds!)
2-3 tbsp. lime juice (about 1 1/2 limes)
1/2 tsp. salt
Mix everything up in a big glass or plastic bowl (don't use aluminum--the acid could corrode the metal, and you'd wind up eating dangerous aluminum chemicals). Cover and refrigerate at least 1 hr. to blend flavors. To preserve, simply pour the salsa into pint jars and place in steam canner. Process for about 5 minutes, according to the directions with your canner. The salsa and the water will separate and look nasty, but you can shake the jar and mix everything up again.
For variety, you can add a can of drained/rinsed black beans, or be creative and see what works for you.
Thursday, September 8
Making Yogurt
Have you ever even heard of making yogurt at home? Up until two weeks ago, the idea never even occurred to me. I always thought yogurt came from a store and that was the end of it.
I have a really cool mother-in-law. She's the type who gets really passionate about food storage and emergency preparedness (she can do incredible things with beans), so when she found a class on how to use powdered milk to do all sorts of crazy recipes (cream cheese, cheesecake, mozzarella... yogurt....) she reserved spots for the whole family. I was completely fascinated by the number of things the teacher could do with powdered milk (which I'd always thought was nasty), and the fact that most of the stuff tasted really good.
So the other day I decided to try making yogurt, and it turned out really well. Here's the recipe I used:
1 1/2 c. warm water
2 1/3 c. instant powdered milk
1/4-1/2 c. plain yogurt (the fresher the better--the cultures die after a while, and your yogurt won't set as well if they're dead. Start can be unflavored yogurt from your last batch!)
2 c. warm water
Blend the 1 1/2 c. warm water and the powdered milk. Add the yogurt and blend again. Add the mixture to 2 c. warm water and pour into small jars. (The yogurt tastes really bitter if you don't add sugar, so I added 1 tbsp. sugar and 1/2 tsp. vanilla per 1 1/2 c. jar. You can add other flavors later.) Set the jars in a cooler or pan full of warm water (between 100 and 120 degrees) and set in a warm place. The yogurt needs to be in that temperature range for about 6 hours (up to 24) in order to set. I put mine in a cooler, and it was ready in a little over 6 hours.
Later I added a little bit of mashed banana and some apricots, and it was incredible. My husband's favorite is applesauce, and we like cherries too. So good! The flavor possibilities are endless--canned or fresh fruits, freezer jams, syrups, etc. Be creative!
Bon appetit!
Wednesday, September 7
Introduction to Me
I asked my husband last night what the difference was between writing a blog and writing in my journal. He said it was that other people could read it and make comments--just what I always wanted! I wonder what all those poor little brothers are going to do now that their sisters don't care when they read their diaries.
Anyway, now that I've finally caught up to the blogging age, I thought I'd start my own blog. I'm a twenty-something housewife with a bachelor's in English, a 6-month-old son, and a lot of spare time. Lately I've been using my kitchen as more of a lab, where I've been experimenting with weird new recipes. I decided to start a blog because I love cooking, and it's always fun to share good recipes and disaster stories. And since it's my blog, I'll also post about whatever else I deem important--political rants, religious/moral views, what my kid's been doing, or what Mike and I do for fun on a Friday night in Spanish Fork.
Anyway, now that I've finally caught up to the blogging age, I thought I'd start my own blog. I'm a twenty-something housewife with a bachelor's in English, a 6-month-old son, and a lot of spare time. Lately I've been using my kitchen as more of a lab, where I've been experimenting with weird new recipes. I decided to start a blog because I love cooking, and it's always fun to share good recipes and disaster stories. And since it's my blog, I'll also post about whatever else I deem important--political rants, religious/moral views, what my kid's been doing, or what Mike and I do for fun on a Friday night in Spanish Fork.
Subscribe to:
Posts (Atom)